Tuesday, 29 January 2013

#10 Entry- Experiment: Crystallization

Today we had a chance to make our very own crystals!

It was really fun and cool.

What is Crystallization?
Basically, crystallization is the most common method used to purify soluble solids. There are many ways to carry out crystallization. The seeding method allows you to grow a large single crystal, others allow you to grow many crystals at a time. By controlling the variables such as cooling rate and evaporation rate, the size and shape of the crystals can be controlled.

Some conditions:
Firstly, the solid must be soluble in water. Secondly, the solubility of the substance should change with changing temperature. (eg solubility increases as temperature increases). Thirdly, the solution used should be saturated with the solute.

For the experiment we conducted, we purified copper (ll) sulphate crystals and investigate the effect of the cooling rate on the size of the crystals obtained.

Steps:

  1. Heat about 20cm3 of water in the beaker. Stop heating and remove from the tripod stand once bubbles are observed in the water or when the water boils.
  2. Add one spatula of copper (ll) sulphate into the hot water.
  3. Stir the mixture until the copper(ll) sulphate dissolves before adding another spatula of copper(ll) sulphate.
  4. Repeat Step 3 until no more copper(ll) sulphate can be dissolved
  5. Filter the solution if there are any solid impurities.
  6. Heat the copper(ll) sulphate in an evaporating dish.
  7. Stop heating when about half the solvent has evaporated from the solution. Do not heat the solution to dryness. (If a crust form,stop heating and add a little water)
  8. Pour the solution into a boiling tube and cool it in ice-cold water and measure the time taken for crystals to appear.
  9. Collect the crystals and dry them on filter paper
  10. Observe the crystals formed.


Step 6


Residue left after filtering the solution

Step 8

After a while of cooling (crystals are forming)


So there! The very awesome experiment.


Reflection: It was cool to see how crystallization was performed as this process is applied to daily life, to make sugar crystals that we eat. I think it is a tedious process though, to make sugar crystals.

End


Thursday, 24 January 2013

#9 Entry- EXPERIMENTS!


Today we did 2 experiments. One on Chromatography and simple distillation.

Since it was a very simple process, Mr Foo did not show us a sample set-up.

Steps:
1. Take a strip of chromatography paper and use a ruler to draw a line about 1.5cm away from the end of.
2. Dip the capillary tube into green ink, and blot a little in the middle of the drawn line.
3. Repeat this process till you get a concentrated spot of food coloring.
4. Add distilled water into the test tube till you cover the circumference of the bottom of the tube.
5. Slowly insert the chromatography paper into the test tube, making sure that the paper does not touch the line.
6. Use a clothes peg to secure the paper. Meanwhile, wait for the distilled water to rise.
7. Measure the distance where the distilled water stopped. Draw a line. This line is called the solvent front, and is the maximum amount.
8. Rf= Distance travelled by spot / Distance travelled by solvent


Component
Distance moved by spot/cm
Distance moved by solvent/cm
Rf
Yellow
6
11.6
0.517
Blue
10
11.6
o.862


Simple Distillation:
Mr Foo demonstrated the simple distillation method with coke. It was really smelly!

Anyway, I learnt that simple distillation and fractional distillation are similar in some ways. Both of them have boiling, condensation and require heat energy. They are different in the sense that simple distillation does not require fractionating while fractional distillation has fractionating column.

They are used to separate solvent from a solution and the fractional distillation is to separate 2 miscible liquid.

Reflection: I learnt many new things today, and learnt way we have to study about this topic. It is essential to scientists, food manufacturers etc to determine the purity of a substance using chromatography, and also using simple distillation to obtain pure water.

Thats all for today!

#8 Entry- Separation Techniques

We covered Separation Techniques today, in preparation for tomorrow's practical.

First we did a recap on paper chromatography, and here are some things to note when carrying out the experiment.


  • always use pencil to mark the line, not pen as pen contains ink 
  • solvent front: where the ink stop moving, the ink will not go beyond this line
  • mobile phase: solvent (moving)
  • stationary phase: paper (not moving)
  • make sure the ink doesn't touch the pencil line 
  • solvent below pencil line so that the solutes would not be in contact with it
  • ink does not dissolve well in water but dissolves well in ethanol
The Rf Value

Rf Value = Distance moved by substance/ Distance moved by the solvent

Conditions that affects the results:
  • Pressure
  • Temperature ( for example, if you heat up the solvent, solubility will increase and the spot will be higher, thus more solvent will dissolve. 
To cause a Rf difference: Change solvent / temperature

Simple Distillation

  • Separate the solvent from a solution of so lute
  • IMPORTANCE: Solvent is the main aim
  • Distilled water: No ions at all, pure, however, if humans depend on distilled water, it is unhealthy since we need certain ion and compounds
  • No evaporation

We were left with some question to do research on:
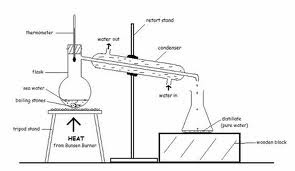
  1. What is the purpose of the boiling stone
  2. What does it mean by smooth boiling and/ or what happens if you do not have it?
  3. What is the condenser for?
  4. What is the thermometer for? 
  5. Why is there are water inlet and water outlet? What purpose does their position serve?
1/2. What is the purpose of the boiling stone AND What does it mean by smooth boiling and/ or what happens if you do not have it?
  • known as the boiling chips/ anti-bumping granules
  • minute, unevenly shaped stones added to liquid so that they can boil easily
  • fluids can boil easily without turning superheated
  • without the, liquid heater in horizontal container might become superheater and 'bump' suddenly. discharging vapour occasionally
  • reagents/ discharge may spill it it bumps
  • made of absorbent matter eg alumina, calcium, carbonate, carbon, with non-reactive teflon which makes sure boiling chips offer effective nucleation spots
3. What is the condenser for?
  • What water is boiled in a close container known as a boiler, vapour evaporating from the surface of the boiling water passes through a pipe leading from the boiler to a vessel, called a condenser
4. What is the thermometer for?
  • Positioning is crucial: entire mercury bulb must be positioned below the bottom of the orifice leading to the condenser
5. Use of water inlet and outlet
  • Cold water is used to condense the gas to become liquid. It should not switch places because water out is hotter and hot water rises due to convection. If the water outlet is put below, the condenser would not work because the whole set-up will heat up and hence it does not serve its purpose.
Reflection: Today I learnt why separation techniques are important as well as did research that increased my knowledge of this topic.

Next Lesson: Practical- Separation Techniques


Monday, 21 January 2013

#7 Entry- Summary of ECM, Separation Techniques

Today, we briefly summarised ECM and started a little on Separation Techniques.

Summary
Mixture of elements:


Which diagram shows the mixture of elements?
Ans: Z

Types of mixtures: 
  • 2 elements
  • 2 compounds
  • 1 element, 1 compound
Compound must have fixed proportion of certain elements. A different proportion will result in a completely different compound. Eg H2O

Alloy:
  • Mixtures of metals and other elements
  • Stronger than normal metals (pure metals are malleable)
  • eg bronze, stainless steel

Separation Techniques
Separation techniques are used to separate mixtures.

Types of techniques:
Filtration, distillation, chromatography and/or electricity, chemical reactions

Filtration: Used when one substance is soluble and the other is not soluble in water

Examples of Pure and Not Pure

Pure
Not Pure
Oxygen
Carbon Dioxide
Acid
Water


*pure: all elements on the Periodic Table

Why must substances be pure?
  • Health hazards
  • Food, medicine must be pure 
  • Test out characteristics of certain elements: Properties such as melting point, boiling point, density
  • Identification: Test to prove something, hence, have to separate first
  • Production of useful substances
  • There isn't 100% pure substances, at most, it can be 99.99999...% pure
  • To determine the degree of purity: Mass Difference
How to determine if something is pure:
  • Fix melting point, boiling point
  • Chromatography: Separated into different components
Paper Chromatography:
  • Separate mixtures of solutes with different solubility and degree of absorption
  • More soluble: move further up
  • Not so soluble: Stay at the same position
  • Use a solvent medium/ porous or absorbent: paper/gel
  • Dye/ Sugar (Sugar: Glucose/Fructose)
Process:


That's all for today! 


Thursday, 17 January 2013

#6 Entry- Atomic Structure

Today we covered Atomic Structure.

So, and element can be split into many sub-groups.
Element-->atom --> sub-atomic particle (number of particles, periodic table)
Element--> Made up by molecule

So what is sub-atomic particle?
Basically, they are the smaller parts that make up the atoms. They consists of protons, neutrons and electrons.

Protons and Neutrons are called nucleons and they are found in the nucleus.

Relative Mass
Since an atom's mass is almost negligible, scientists have came up with a simpler, more generalised form of its mass. It is termed 'Relative Mass'.

Relative Mass is represented by 'amu'. So 1 amu= 1.67x 10^-27 kg

Proton

  • Carries a charge of +1
  • Has a relative mass of 1
  • Symbol = p


Neutron

  • It has no charge
  • Comes from the word 'neutral'
  • Relative mass of 1
  • Makes an atom radioactive 
  • Symbol = n

Electron

  • Carries a charge of -1
  • Negligible mass/ relative mass of 1/1840
  • Found in shells, surrounding the atom
  • Symbol = e
General Information of Atoms

  • All atoms are electrically neutral
  • Equal number of charges
How to read the elements on a Periodic Table

  • Proton number = z
  • Atomic Number (number in superscript)
  • Nucleon number (A) = Proton + neutron 
  • Each element has a unique proton number
  • Nucleon number: Proton + neutron
  • Every element has a unique proton number
  • Mass number and Nucleon number share the same number, but they are not the same thing
(Reason: Take for example Carbon, which nucleon number is 6, and proton number is 6. So it has 6 protons, and 6 neutrons:
6p = 1 x 6
6n = 1 x 6
The total number is 12, which is the same as the nucleon number. )


Above shows how to read an element on a periodic table.


Reflection: Today we learnt something new: Sub-atomic number. It was quite interesting since I once thought cells were the smallest unit of life on Earth then I learnt that there were molecules and then there were atoms and now, sub-atomic particles! Interesting it is, how small things can get!


Next lesson: Separation techniques

Monday, 14 January 2013

#5 Entry- Experiment: Creating a Compound

Today we had practical and did a very interesting experiment that took my knowledge of Chemistry up by one notch.

The experiment required us to deal with iron fillings and sulphur powder, mix them together (mixture), heat them, (chemical reactions take place) and form a compound.

Aims
1. To observe and compare the properties of compounds and mixtures made up of the same *constituent elements.
2. Thus, infer some common characteristics of mixtures and compounds that can be used to distinguish them.
*Constituent=being part of a whole

Part A
First,  we had to observe the appearance of the 2 elements that we were dealing with.
Iron filings: Silvery grey powder
Sulfur powder: Yellow powder

We then poured one spatula of sulfur powder and ion filings onto a piece of filter paper. Next, we mixed them together. At this point in time, the iron filings and sulfur powder formed a mixture. After that, we used a magnet to try to separate the iron filings and the sulfur powder. Finally, we poured the mixture into a test tube of water.

Discoveries:
1. The mixture will not and did not feel hot when I felt the bottom of the filter paper as no chemical reaction is taking place.
2. The magnet was able to separate the iron filings and the sulfur power.
3. When poured in water, the iron filings sunk to the bottom of the test tube, however, the sulfur powder floated above. Reason: The iron filings are denser then the sulfur powder.
4. The iron filings and the sulfur powder act as separate substances.
5. The mixture retains the chemical properties of the constituent substances.

End Result:


Part B
In the second part of the experiment, we were required to heat up another mixture of iron filings and sulfur powder.

The mixture was poured into a crucible which we heated using a bunsen burner. It was a good recap on how to use the bunsen burner, as well as to practice safety in handling flammable substances. (***sulfur is flammable***)

The mixture when heated, gave out a foul smell. We later learned that this smell was produced by sulfur as it burns readily in air, to produce a poisonous gas, sulfur dioxide.

Everyone was covering her nose by the time we started heating!

Later, when I removed the crucible from the bunsen burner, I dropped it and it cracked. I realised that I may not have let it cooled long enough, and Mr Foo pointed out that the expansion and sudden contraction may have caused it to crack.

While Heating:


Discoveries:
1. Compound: Chemically combined, loses its constituent substances' properties. It has different physical properties.
2. A compound cannot be separated by physical means.
3. Chemical reaction takes place when a compound is formed when there is an energy change.

That was all for the experiment!

Reflection:
I learn a fair bit from today's simple, yet beneficial experiment. We had to adhere the lab safety rules, and also got to learn how compounds were formed, personally. I feel that it is easier to understand the lessons on elements, compounds and mixtures after we had conducted today's experiment.

Next lesson: Separation Techniques, (Atomic Structure?)

Oh, and finally...

Safety Goggles!

Sunday, 13 January 2013

#4 Entry- Elements and the Periodic Table

Elements, Compounds and Mixtures

For today's lesson, we touched on elements (atoms and molecules) and the periodic table (metals, non-metals and properties).

Definitions
Element: An element is a substance made of only one type of atom
Atoms: An atom is the smallest particle that retains the properties of the element
Molecule: A molecule is made up of 2 or more atoms that are chemically joined

Atoms
  • Atoms retains the chemical properties of the element 
  • Different atoms represent different elements
  • The factors that differentiates the atoms are: size and spacing (between atoms)
  • Diatomic: 2 atoms chemically joined together
  • Triatomic: 3 atoms chemically joined together
  • Polyatomic: 3 or more atoms chemically joined together
That is generally what we covered for atoms. More importantly is the Periodic Table.

Periodic Table


The Periodic Table is split into groups based on several criterial: metals/non-metals, number of subatomic particles (protons) and melting point boiling point etc. All these are related to the properties of the element. As seen from the periodic table above, there is a staircase line separating the elements, at   Al, Ge, Sb and Po. The elements on the left-hand side of the periodic table are the metals. The elements on the right-hand side are the non-metals. Those in the middle are called transition metals. Bordering the separation line, Sl, As etc, they are considered metalloids as they have both the characteristics of a metal and a non-metal. 

Things to note:
  • When one writes the group of the elements, always use the roman numerals (eg I, II, III, IV...)
  • Periods can be written using normal digits
  • The elements are arranged according to increasing atomic number
  • First letter of the chemical symbol must always be written in capital letters
  • On the extreme right of the periodic table, are the noble gas, they are called group 0. 
Noble Gas
Noble gas is an unreactive element. It means that it does not bind to any atoms, nor does any atoms bind to it.

Lastly we went through the assignment and here are some pointers to note:

  • Melting point below 25°C is considered low melting point
  • High melting point: Above 100°C (in reference to water)
  • Electrical Conductivity: value less than 1, considered low
Terms
Malleable: Bend easily
Ductile: Can be drawn into wires

Reflection: Today we learnt many new things such as the periodic table and more on elements. I also learnt an interesting fact, that pure metals are actually malleable! It was also interesting to learn how the periodic table works. It is really organized, and I believe we will get round it soon. 

Well, that is all for today!

Next lesson: Still on Elements, Compounds and Mixtures and the Periodic Table. 
***Experiments conducted the next lesson***


Thursday, 10 January 2013

#3 Entry- Experiment: Bunsen Burner

Elements, Compounds and Mixtures

Today, we started of by conducting en experiment with bunsen burner.

Before we started any experiment or lessons proper, Mr Foo reminded us of the lab rules and regulations such as: no hair hanging loose as it may get burnt. We were told where to obtain our safety goggles, test tubes, beakers etc.

After that, we were given a worksheet, with the experiment steps on them. The first page was on the parts of the bunsen burner.

This is how the bunsen burner looks like:


After we had a demonstration by Mr Foo, we started on the experiment ourselves.

Steps:
1. Connect the bunsen burner to the gas source and turn it on
2. Close the air holes
3. Strike the match 
4. Adjust the flame by adjusting the air hole

What to look out for: Flame color

The different flame color is resulted by the oxygen and carbon that the flame gets. 

Here is a picture to explain why the flame is of a certain color.


Part 2 of the experiment was to test which part of the flame was the hottest. We held a copper wire with  tongs, over the flame. 

Since the flame was divided into 3 parts: The bottom of the flame, the tip of the blue flame and the combustion part of the flame (orange)

The tip of the blue flame was the hottest area as we observed that the copper wire caught *'fire' the fastest there. (*copper wire turned orange) 

Later, we moved on to plot the table of results. Initially, my partner plotted our tables wrongly by placing the independent variable on the right of the table and the dependent variable on the left. However, we realized that when we present information in a table form, the independent variable on the left and the dependent on the right.

Lastly, we had to research on the element we had 'adopted' the previous lesson. I adopted the element Helium and found out some facts about it.

Reflections:
Today was enjoyable as I got to handle an apparatus that I have never used in my life before, hence it was fun. However, since we handling with fire, I was a little tentative. But it was all well and nice, and I learnt a great deal of things today.

Next lesson: Periodic table, Elements, Compounds and Mixtures

Wednesday, 9 January 2013

#2 Entry- Introduction to Elements

Elements, Compounds and Mixtures

Today, we started on Elements. Mr Foo gave each group a sheet of paper which has several boxes of atoms and particles in them. He had us classify them according to our own criteria, before he told us what was what.

My group's criteria was: Shape and Color

We later had to guess the different criteria that other groups used to classify.

Several Questions:
1. Which one do you think comes from same type of substance? Why?
Criteria: Same size of particles, same shape, same color

2. What do you think each particles represents
They represent different elements, compounds and mixtures.

Some pointers to note: 
- Mickey mouse shape molecules are water molecules
- As long as they do not form bonds, they are different
- Particles in orderly position VS particle in random position
(Reason: Particles that are in random position are heated)
- The more particles that occupy the same space per unit, the higher the density
- Particles is a general term that represents anything inside a substance. Atoms and molecules are sub groups of particles


Particles-Atoms-Molecules


Questions:
1. How do these particles bond?
2. Why do they bond?

Next lesson: Periodic Table, Elements, Compounds and Mixtures


Monday, 7 January 2013

#1 Entry- Laboratory Equipment and Set-Up

Elements, Compounds and Mixtures

For today's lesson, we started off with a revision of our previous topic covered in NaPS - drawing of experimental apparatus. It was refreshing because it had been a long break since we last got a chance to draw these apparatus (since Semester 1).

Some of the apparatuses that we were required to draw:

Mr Foo had us try it out ourselves first so that he could critique us when he marks our work. He pointed out some of the common mistakes that were often made:

Mistakes:
1. Sketchy lines
2. Disconnected drawing
3. An arrowhead pointing towards the apparatus
4. Wrong scale of apparatus (according to those drawn, e.g tripod stand drawn the same size as evaporating dish)
5. Freehand drawing of apparatus

Corrections:
1. Lines are supposed to be neat and straight
2. All lines to be connected and continuous, no breaks between
3. Use a line to indicate instead (scientific way)
4. Draw apparatus to scale with other apparatus drawn
5. Always draw with a ruler

That was all for today. 

Coming up next... Elements, Compounds and Mixtures